Your basket is empty.
 Free shipping over £159 Open purchase 30 days Fast delivery Customer service 0300-308 60
 Secure payments with Qliro
 B2B LOGIN
Free shipping over £159
Open purchase 30 days
Fast delivery
Customer service 0300-308 60
Secure payments with Qliro
Installing additional lights involves attaching the lights securely, connecting a power supply that can handle the load, and arranging a control that follows the car's high beams. Which connection is suitable depends on the car and the equipment you have chosen. Therefore, check the installation instructions, wiring diagram, and high beam signal before you start, so that the bracket, wiring, and control work together.
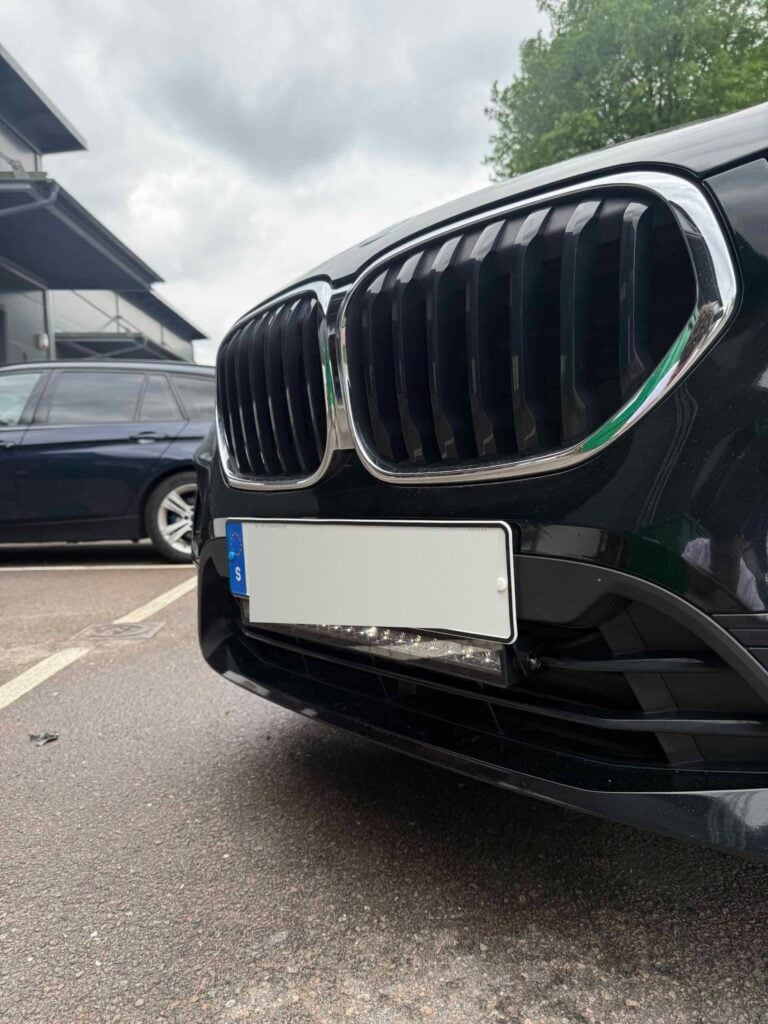
Lights, brackets and wiring need to fit both the car and each other. Start with the dimensions of your driving lights and check how much space the lights and their mounts take up. Read the instructions for the car and the products, including how to de-energize the car before working. A general guide does not replace the installation instructions for the car or accessories.
Make sure you have:
The tools depend on the installation, but screwdrivers, socket wrenches, cable lug pliers and cable ties may be needed. If you are going to measure a control signal, you also need to know where and how the measurement can be made on the particular car. If you choose a driving light kits You still need to check the contents and what is required for your car.
The bracket should provide a stable mount and position the lights so they fit without obscuring the car's sensors or cameras. Check the space behind the mounting points before drilling or screwing. Follow the instructions for the car and the bracket; the crash bar should not be used as a general drilling point.
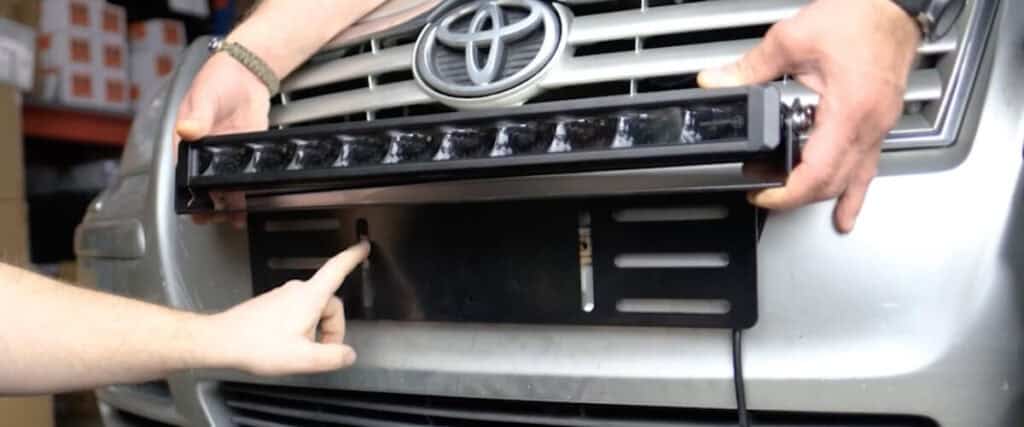
If the holder is to be located behind the license plate, start by removing the license plate and the license plate holder. Align the auxiliary light bracket and mount it with the appropriate fasteners. Then attach the lights and any struts according to the instructions. Allow for adjustment of the direction of the lights before final tightening.
The wiring should reach the lamps without being stretched and should be routed so that it does not rub against sharp edges or come into contact with hot or moving parts. Plan the routing before connecting and secure the cables so that they are protected. Check the polarity and pin placement of the connectors against the wiring diagram, not just that the connectors can be pressed together.
Power supply, ground connection and fuse should be carried out according to the instructions for the car and the cable set. Place the power supply fuse close to the voltage source according to the wiring instructions. Do not choose the fuse or cable area only based on how many lamps you are installing, but check the installation load and the specification of the wiring.
The high beam signal tells when the auxiliary lights should be switched on. It should be separated from the power supply that supplies the lights themselves. Which signal can be used must be checked for the car in question; a particular model year, LED or bi-xenon alone does not provide the answer.
In a traditional relay installation, the high beam signal is used to control the relay, while the auxiliary lights are powered through the fused supply circuit. Do not use the car's high beam cable as a general supply for the auxiliary lights. Check the car's wiring diagram and the wiring harness diagram before connecting a signal. Cable colors are not a common standard for all cars and wiring harnesses.
For some cars, a compatible interface is required for the high beam control. With XBB Dongle and PowerUnit the dongle is connected to the diagnostic socket and communicates wirelessly with the PowerUnit. Check the correct vehicle profile and working signals before connecting. Follow XBB installation manual for configuration, load limits and possible use of a separate power relay.
Other solutions may also be applicable depending on the car. Choose a method based on verified compatibility and manufacturer instructions.
Extraljusen ska fungera tillsammans med den valda helljusstyrningen. Kontrollera anslutningarna innan anläggningen spänningssätts enligt anvisningarna. Testa att lamporna tänds och släcks som avsett när du växlar mellan hel- och halvljus och kontrollera eventuell separat strömbrytare. Positionsljus och andra extrafunktioner behöver egna kontroller enligt respektive produkts anvisningar och godkännanden.
Align the lights according to their installation instructions and have a workshop help with the adjustment if necessary. A certain distance to a wall or a certain height is not a complete adjustment guide for all auxiliary lights. Tighten the attachment according to the instructions and check that the wiring is protected and that the lights do not vibrate.
You can order selected additional lights and mounting together if you want a workshop to perform the installation. Xenonkungens extra lights with installation at a fixed price booked in connection with the purchase. There you will see current products, installation prices and available workshops, so you can choose a solution for your car.
Installed and Ready
Would you rather have a workshop install it?
Buy extra lights with installation, and one of our partner workshops will install them for you. Installation has a fixed price and is booked when you shop.
The cause cannot be determined from the symptom alone. Check the power supply, ground connection, contacts and control according to the equipment's troubleshooting instructions. If you are using an interface, its configuration and load also need to be checked. Do not change to a larger fuse to try to eliminate the fault, but find the reason why the installation is not working as intended.
It depends on the weight of the lights, the bracket and how stable the mounting is. Follow the recommendation for the light and the bracket instead of just going by the inch size. If the light image vibrates, the mounting needs to be checked; a brace will not replace a bracket that is incorrectly mounted or does not fit the load.
Choose a cable set based on the voltage of the lights, current requirements, connectors and how the installation is to be controlled. Also check that the wires reach and that the permitted load of the cable set is sufficient. The number of lights alone does not determine which set is needed. Always follow the specified limits for wiring, fuse, relay and any control unit.
Based on the car's wiring diagram and a solution that is verified for the car and its equipment. The lamp type alone does not determine how the signal can be retrieved. If you use an interface, the correct vehicle profile and functioning high beam signal should be checked according to the manufacturer's instructions before completing the installation.