An LED strip is one of the smartest lighting additions you can make to your car. Whether you drive an older Volvo V70 or a newer SUV, installation can be done at home in the garage with basic hand tools. In this guide, we'll walk you through the entire process – from choosing the mounting location to connecting to the high beam.
Three ways to mount a led ramp
There are three main mounting methods, and which one is best for you depends on your car and how visible you want the installation to be.
Behind the license plate is the simplest method and does not require any permanent intervention. You unscrew the sign, attach a license plate bracket behind and mounts the ramp. Fits most passenger cars and is the most common solution for steel plate ramps around 20–22 inches.
In the grill gives a more discreet, recessed look. May require you to make a cutout in the grille, but the result is that the ramp blends into the car. Popular for straight articulated ramps in shorter sizes.
On the roof Fits longer ramps and provides the best light height. Requires roof rack mounts or clamp mounts. Most commonly used on pickups, SUVs and work vehicles where maximum light output is prioritized over discreet appearance.
See the entire assembly in video
What you need
The most important thing is a complete relay cable set. It connects the ramp to the battery via a relay and fuse, which protects the car's electrical system. Connecting a ramp directly to the high beam cable without a relay risks overloading the circuit.
LED ramp – straight or curved, in the size that fits your car
Current thief or cable lug – for connection to the high beam
Fine-blade saw or FEIN – if you are installing in the grill
Install the LED strip step by step
We will start with the most common method: a LED ramp mounted behind the license plate with a relay cable set connected to the high beam. The basic principle is the same regardless of the mounting location – what differs is how you physically attach the ramp.
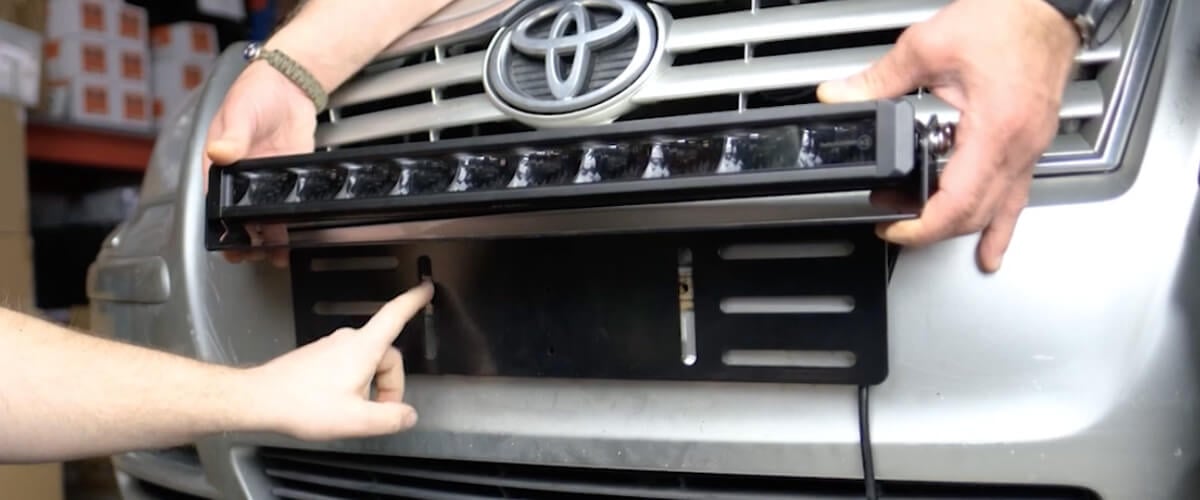
1. Plan the placement
Decide where the ramp will be placed. Measure the space and make sure the ramp will fit without obscuring the license plate. Think about where the cable can pass behind the bumper – it helps to have a plan before you start screwing. Mark the position with tape if it helps.
2. Install the bracket
Unscrew the license plate. Attach the license plate bracket behind the sign and mount the ramp on the bracket. Screw everything back in and check that it is secure. Vibrations will reduce the light output and can damage the connectors over time, so tighten securely.
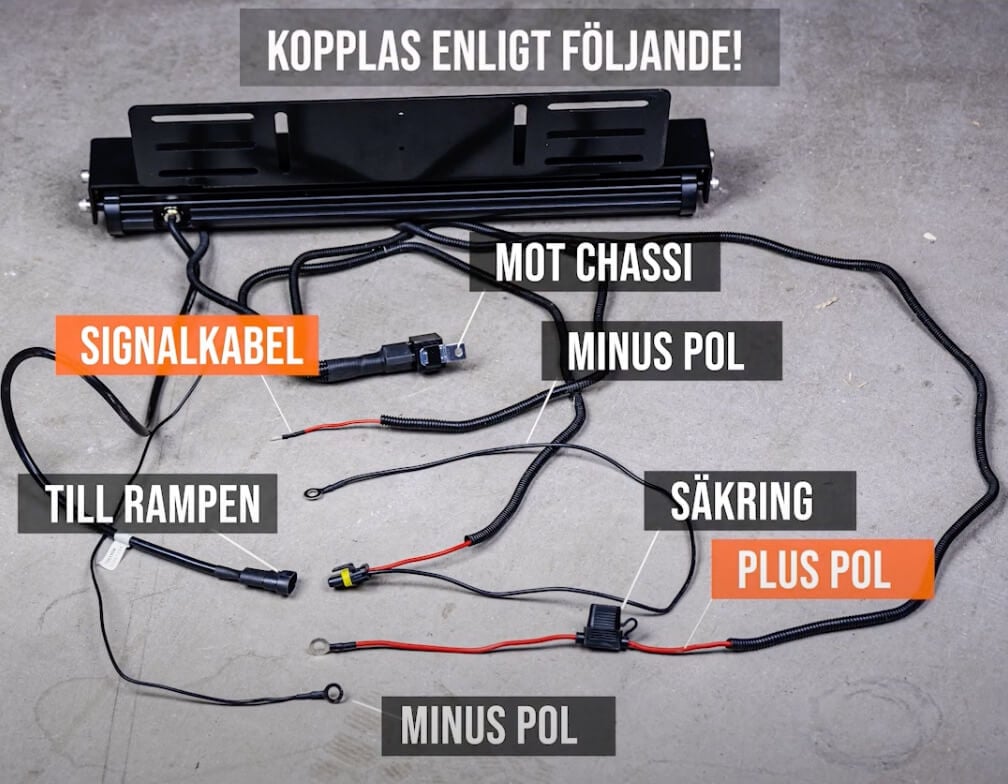
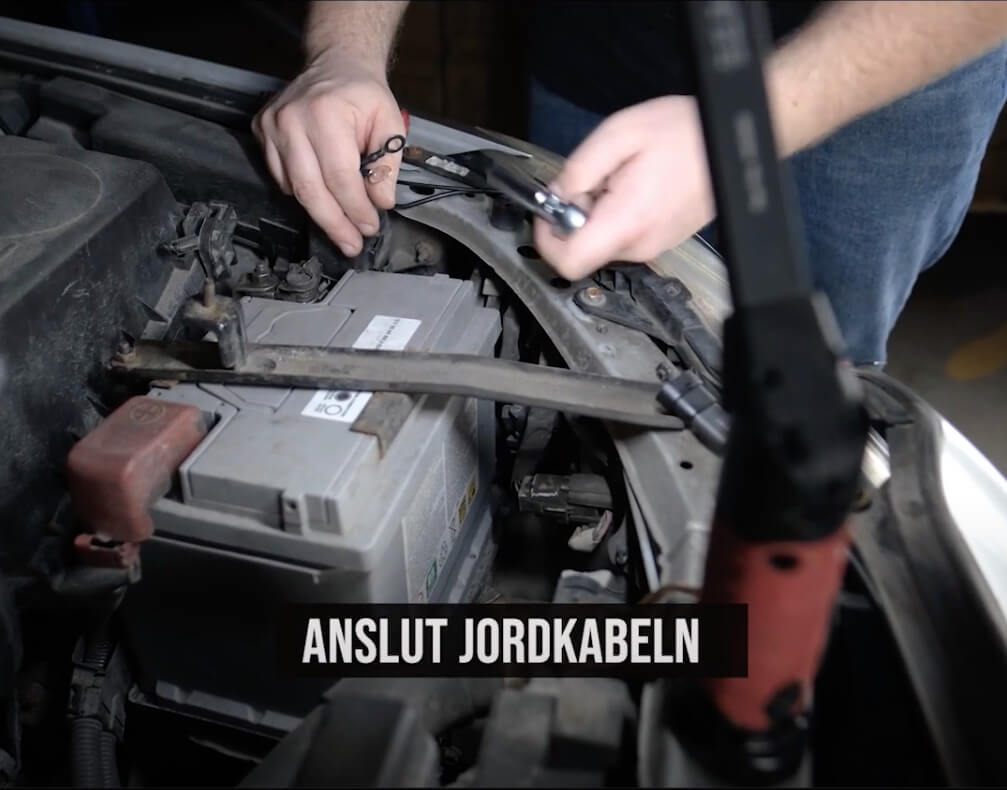
3. Draw power from the battery
Connect relay cable set positive cable to the battery's positive terminal. The ground cable is attached to the car's body or an existing ground point. The relay and fuse in the cable set ensure that the ramp never puts a strain on the car's original electrical system.
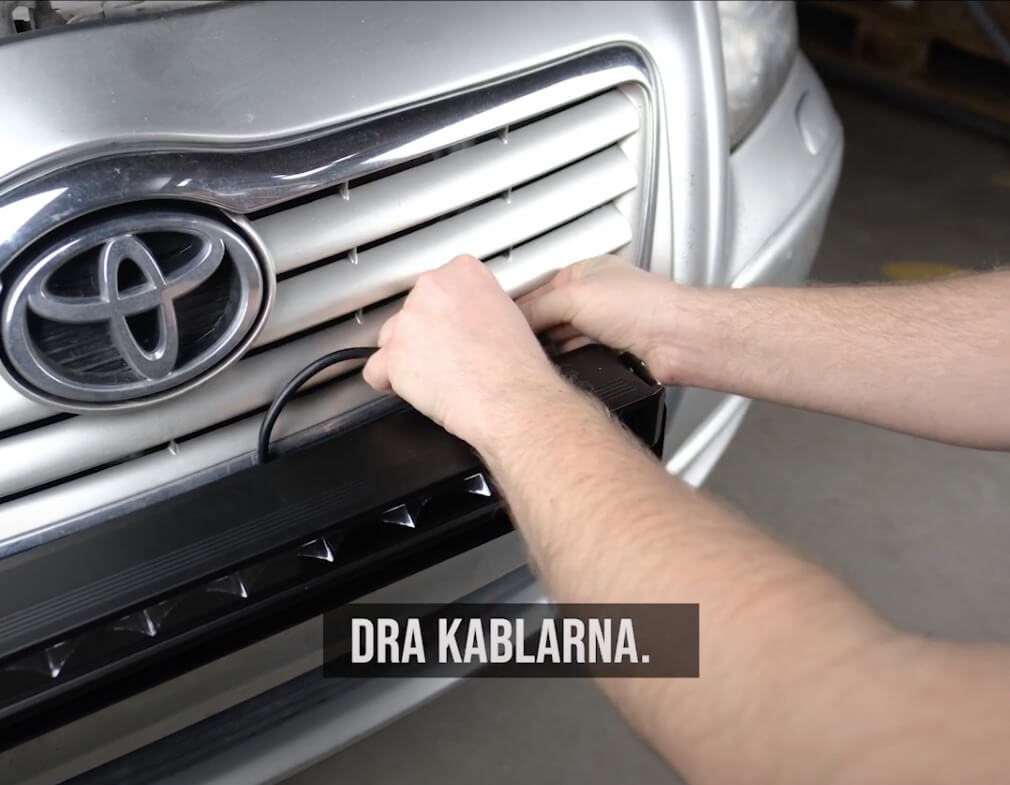
4. Connect the ramp and run the cables
Connect the ramp connector to the wiring harness. Then route the cables along the existing wiring harness behind the bumper and up towards the engine compartment. Secure with cable ties and avoid hot engine parts and moving components. Careless wiring is the most common cause of problems in the long run.
5. Switch on the high beam
This step will automatically turn on the ramp with the high beam. There are two ways depending on which car you have:
Older cars (approx. 2000–2010): Use a multimeter to find the high beam wire at the headlight. Connect the relay wiring harness signal wire to it with a wire stripper or wire lug. Straight through, no middlemen.
Newer cars with CANbus (approx. 2005 onwards): Many modern cars have LED or xenon headlights where a traditional high beam cable is not available. Here is a XBB Dongle the most convenient solution. The dongle connects to the OBD port under the steering wheel and reads the high beam signal wirelessly. You avoid cutting the wiring and retain the full warranty. If your car has regular halogen bulbs and a clear high beam cable, the traditional method works great even on newer models.
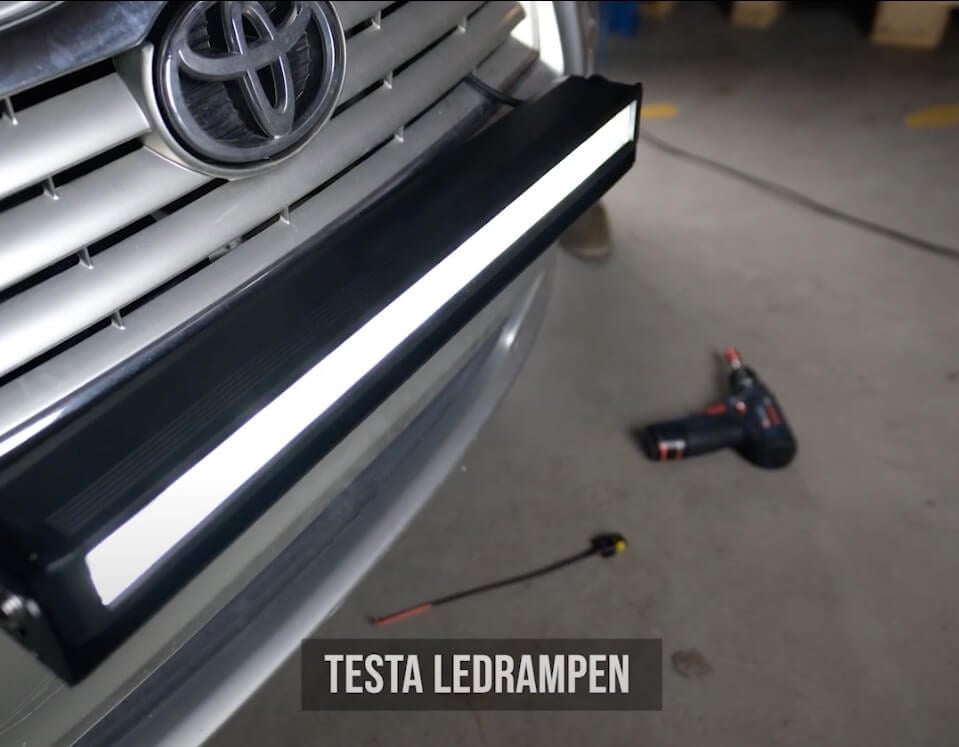
6. Test and check
Turn on the ignition and test the high beam. The ramp should turn on and off together with the high beam. Check that the license plate is still clearly visible, that no cables are hanging loose and that the light pattern is pointing in the right direction. If your ramp has position lights, test that too.
Would you rather have it installed? We offer professional installation at a fixed price through our network of workshops around Sweden. You choose the product, we do the rest. See all products with fixed price assembly.
Option: Mount in the lower grill
If you want a more discreet installation, you can fold the ramp into the car's lower grille. This requires measuring the opening, sometimes making a small cutout with a FEIN or fine-blade saw, and screwing the ramp in from the inside. The advantage is a cleaner look and sometimes easier wiring. The disadvantage is that it is a permanent intervention in the grille. The power connection and high beam connection work the same as for license plate mounting.
Good to know before you start
An E-marked LED light is legal to use as an additional light on public roads. It must be connected to the main beam and must not obscure the license plate. If the light does not have an E-mark, it may only be used off-road or as a work light.
Allow 30–60 minutes for a complete installation at the license plate. Grill assembly may take a little longer. If you have never connected auxiliary lights before, it is worth spending an extra half hour to plan the wiring properly – it will save time in the end.
If you purchase a ramp and cable kit separately, make sure the connectors match (most common are Deutsch connectors, but this varies). Our articulated ramp package contains everything needed and is matched to work together directly.
Frequently asked questions about installing a led ramp
Allow 30-60 minutes for installation behind the license plate with relay wiring kit. Grille installation may take slightly longer if you need to make cutouts. With an XBB Dongle you save time on the high beam connection.
Yes. One relay cable set connects the ramp to the battery via a relay and fuse, instead of loading the car's existing circuits. Without a relay, you risk overloading the high beam circuit.
Easiest with one XBB Dongle which reads the high beam signal wirelessly via the OBD port. You don't have to cut the wiring and avoid error codes. Works with most cars from around 2005 onwards. If your car has regular halogen and a clear high beam cable, the traditional method also works.
Yes, an E-marked LED bar connected to the main beam is legal on public roads. Bars without an E-mark may only be used off-road or as work lights.
Ramps around 20–22 inches (50–56 cm) fit most passenger cars for license plate mounting. If you want a longer ramp for the roof, go up to 30–50 inches depending on the width of the car. Check straight articulated ramps or curved depending on the design language of your car model.
Find the right led ramp and accessories
At Xenonkungen we have LED ramps in all sizes, complete relay cable sets and brackets for most car models. We also have ready-made articulated ramp package where everything is included. Prefer to skip the installation altogether? Check out Installed and Ready – we install for you at a fixed price. Not sure what fits your car? Contact us then we will help you.
Viktor founded Xenonkungen in 2004 and has over 20 years of experience in automotive lighting. He writes regularly about LED technology, ECE regulations and practical installation.
Xenonkungen.com strives to be your go-to destination for all your automotive lighting needs. We are constantly working to offer you the best products, competitive prices and excellent customer service.
Heads up!
We are currently launching our new e-commerce, everyone who had an account on our old site will receive an email from us
with updated information continuously. If you have not received an email from us before 16/8, please contact us
here.


 Shipping from £15.40
 Secure payments with Klarna
 B2B LOGIN